Planning is key to achieving a safer takeoff and landing. These include choosing the right location, being aware of trees, rocks, and power lines in the area, and checking the weather condition, wind speed, and direction. Your focus and awareness of your surroundings are also crucial. The better prepared you are, the safer your takeoff and landing experience will be.
How Do Paragliders Start?
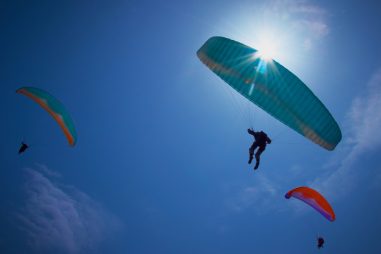
Once all your equipment is ready, you can start by running at a 45-degree angle, your chest high, your head up, and your hands raised behind you or on the side. Doing this will help inflate your glider once it reaches a certain level of speed. The wing then obtains a lift, and you start to fly.
Because 40% of all accidents in paragliding are usually during takeoff and landing, as a beginner pilot, consider the following safety tips:
- Take a lesson from a qualified instructor.
- Do an equipment routine check.
- Choose a paragliding spot within your skill level.
- Ensure the launch area is clear from debris, rock, and trees.
- Wear proper clothing. Get acceptable shoes and gloves.
- Harnesses should be comfortable enough to move in.
- The weather is a huge factor before a launch. Consider planning before paragliding.
- Check the lines, tug them firmly, and check if there are knots.
- Learn how to troubleshoot. It will help you in emergencies.
- Get the equipment that is right for you. There are different types of a paraglider, and you must use one according to your skill level.
The key to starting a paraglider is to be skillful and not lucky. When launching, your body should have control of the wing, not the other way around. As in all sports, preparation goes a long way.
How Do Paragliders Get in the Air?
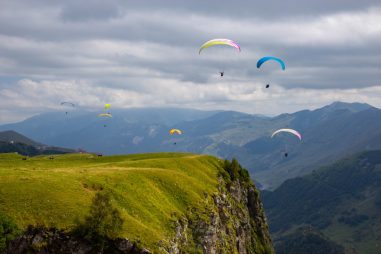
A paraglider gets in the air once it obtains a certain level of airspeed that allows the wing to lift. Ideally, before launch, you will want to locate a pocket of rising air that’ll help increase altitude. You can usually find this in mountains, hills, or anywhere with high elevation. It is why they are the ideal spot for paragliding.
Final tips to help you get in the air:
- Practice doing a transition with your harness. You want to get to a point where it is effortless and doesn’t take your time while in the air.
- Focus on the launch and avoid distractions.
- Use break pressure wisely, in a way that will help you have the feel and control of the wing.
- As the wing starts to fill up with air, utilize your shoulder, arms, and body. You want to avoid being dragged by the wind.
- For liftoff, prepare by gradually leaning forward to a 45-degree angle. It makes it smoother to create airspeed and lift.
The wind is a massive factor in helping paragliders get in the air. A good wind is anything between 2 and 15 mph (3 and 24 kph). Anything beyond 18 mph (28 kph) is dangerous and therefore not suitable for paragliding.
What Causes a Paraglider to Lift Off the Ground?
The wing lifts off the ground when the glider is directly overhead, filled with air, and has reached a level of airspeed. This lift enables you to stay airborne for a long time and is basically your fuel. Here are two main types of lifts in paragliding.
- Dynamic lift: A wind that climbs up over an obstacle creates a dynamic lift. You can take advantage of this by flying on a figure eight parallel to the ridge, turning your back towards the elevated ground.
- Thermal lift: This is where warm, invisible air masses of differing sizes help paragliders gain altitude.
Once you enroll in a paragliding course, you’ll learn aerodynamics and how it applies to paragliding. You’ll also be able to locate these lifts that will help you get the most out of your experience.
Can Paragliders Take Off From the Ground?
Yes, paragliders can take off from the ground. As a beginner pilot, you’ll start on gentle slopes with little obstacles such as trees, rocks, and buildings. Then, wherever it is, launch from a high elevation to get your desired altitude. Familiarity with the weather and aerodynamics will also help increase your experience.
You will need assistance if you wish to take off from flat land. An example would be the use of a car, where it pulls you up into the air, similar to parasailing. Once you have the right altitude to fly on your own, you can disconnect the chord that connects you to the vehicle.
How Does a Paraglider Get Off the Ground?
Lift occurs when you reach a predetermined airspeed, and the wing becomes filled with air. Your paraglider will drop down to the ground if you don’t meet the critical airspeed. The glider must be directly overhead, fully loaded with air. Otherwise, the launch won’t be smooth sailing.
Key things to remember during launch:
- To remove the risk of deflation during a launch, the wings should be perfectly centered overhead, fully loaded with air.
- During a launch, accelerate gradually, fast enough to gain airspeed but slow enough to maintain the wing above your head.
- Demonstrate control of the paraglider by launching directly to the wind utilizing your arm strength.
- Gradually lean forward to a 45-degree angle as you take off. It is the sweet spot where the wing loads with air consistently.
One of the primary reasons for takeoff accidents is the deflation of paragliders. You can alleviate this risk by being knowledgeable of the thermal air, as this is where you can be most vulnerable.
How Do You Launch a Paraglider?
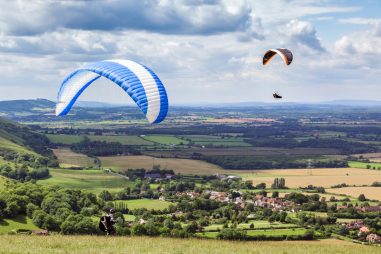
There are three ways you can launch a paraglider. One is called a reverse launch, the other a towed launch, and lastly, the forward launch. These vary based on the weather conditions, the location, and your experience.
- Reverse Launch: This is best in strong winds and high altitudes. It is recommended for more experienced paragliding pilots as it requires skill to perform this successfully. It’ll need perfect brake control and side turning while avoiding the tangling of lines.
- Towed Launch: This launch is perfect for those taking off from flat land where thermals are not easily accessible. It involves the use of a car or a boat to help you get a lift before you can fly on your own.
- Forward Launch: This is performed on higher ground and in a location with a good airstream. Most paragliding pilots prefer this method, as it only requires you to run forward. As a beginner, you’ll want to launch gradually and maintain the wing above your head. One disadvantage is the glider is behind you, so you can’t perfectly see if it’s inflating appropriately or if lines are tangling.
Learning these types of launches is critical when getting into paragliding as part of your flight planning. Stay focused. The launch can be dangerous so take it seriously!
How to Cobra Launch a Paraglider?
Cobra launch is perfect for moderate to strong winds. Basically, you pull the wing up from a crosswind position to reduce the pull force and launch on the side. When performing this launch, you want to be on a grassy location free of debris as you will be learning to drag your glider all over the place.
Steps to perform a Cobra Launch:
- Put your glider on the ground, away from debris.
- Get the tip of the wing out.
- Remove any knots or tangles on lines and risers.
- Start by teasing up the tip of the glider. Then, move as necessary to keep the wing within the cobra or the power zone. This zone is where there is the most force of the wind.
- Fix any big cravette to avoid a deflation risk. It occurs when an uninflated wing fabric blows through the lines.
- Use your arm strength to control the lines and risers (A’s and C’s) as the wing starts to fill up with air.
- Prepare to launch on the side as the wing goes directly above your head.
Some practice is required to perform a cobra launch. It can also be dangerous on rocky ridges or under thermal conditions. Therefore, you will mostly see acro pilots perform cobra launches.
How Do You Reverse Launch a Paraglider?
In a reverse launch, you have overall better control of the paraglider to steer towards a direction as the wing comes up. There is no need to release the brakes, and you can stop if the winds are too strong. To perform a reverse launch, first look for a flat field or a training slope where you can use your glider to be familiar with the technique.
- Prepare your wing by laying it on the ground symmetrically, ensuring there are no tangles in the lines and risers. The brakes should be attached to the risers.
- Establish the direction you want to turn. The general rule is whatever riser is on top. You will follow that direction.
- Place hands on the brakes and the A risers. Doing so helps inflate the paraglider.
- Keep your shoulders parallel to the wing as you try to lift your hands up simultaneously.
- As the wing inflates and forms an arch, you will start to feel the pull of the wind. Use your body and arm strength to take control of the glider. Move as needed.
- Be ready to apply brakes to stop the glider from overflying.
- Once the glider is on top of your head and you see no lines tangled, you are ready to launch.
When the glider starts to rise, prepare to launch immediately and take control of the wing by using the brakes and risers as it starts to lift you off the ground. Only proceed to launch when the conditions are right and your paraglider is loaded with air.
Best Places to Launch a Paraglider
There are different places to launch a paraglider, and the most common are those with high elevation for easier access to thermal air, while others try a different approach by launching on flat land with the use of a vehicle. Here are the best places to launch a paraglider.
- Interlaken, Switzerland: Infamous for its beautiful snow-dusted mountains and lakes, this is arguably one of the most enticing places to paraglide.
- Hautes Alpes, France: This becomes a haven for paragliders in the summer, as it offers an incredible view of the Alps.
- Pokhara, Nepal: Filled with views of the tallest mountains in the world, it offers more rising thermals that help you get the most out of your flying experience along with the mountain ranges.
- Oludeniz, Turkey: The striking blue lagoons from Mount Babadag make it one of the best places to go paragliding. Paragliding is possible all year round.
- San Gil, Colombia: The main attraction is the Chicamocha Canyon, offering its breathtaking scenery of rivers and cliff edges.
- Seiser Alm, Italy: You can paraglide in the largest Alpine meadow in Europe all year round. However, warm apparel is highly recommended in the winter season.
- Valle de Bravo, Mexico: This is the top spot for paragliding in Mexico because of its consistent favorable weather conditions.
- Danyang, South Korea: A favorite among paragliding enthusiasts as it offers an all-year-round opportunity to see Mt. Yangbangsan and Mt Dusan from above.
- Canoa Quebrada, Brazil: You’ll have an amazing view of the ocean as the beach offers optimal conditions for paragliding all throughout the year.
- Queenstown, New Zealand: Paragliding in Queenstown is possible all year round. It’s also one of the favorites because of the beautiful nature and breathtaking views from above.
Remember that each location varies in skill level. Some are more advanced than others. A good paraglider pilot follows these rules for their safety and others.
How Do You Inflate a Paraglider?
A paraglider inflates when it loads up with air. There are many ways to launch a paraglider, but they all share the same result, your glider is filled with air, ready to lift you above the ground. Whichever method you use to launch, avoid launching without a fully inflated paraglider.
Steps to Inflate your Paraglider:
- Lay out the wing and lines on the ground, free of debris.
- Attach the lines to the harness.
- With your hands, grab on the brakes and the A risers facing up.
- The leading edge of the wing should be facing the wind.
- The glider will begin to inflate. Control the risers and apply brakes as necessary to allow them to rise. Check if lines detangle.
- When the wing is above your head, prepare for launch.
Abandon the attempt to launch if the wing is not fully inflated or if lines are tangled. Instead, start over again until the wing is above your head and filled with air.
Why Is It Important to Lean Forward When Launching a Paraglider?
Leaning up to 45 degrees forward is the best way to fill the air on the wing during takeoff. It also makes it easier for you to create airspeed and lift off. On the other hand, standing upright or bending at the hips is least effective as it causes you to lose air on the wings despite maintaining a constant running speed. This method is called the torpedo launch.
Two ways to perform a torpedo launch:
- Start by leaning your body forward, not bent at the hips. Next, put your hands behind you and raise them with your chest high.
- If you are not flexible, you can lean forward and position your hands at the rear with your arms up while running.
Maximize your experience further by studying your equipment and maintaining them well. Begin to lift off only when the glider is above your head and filled with air.
Can Paragliders Gain Altitude?
Yes, paragliders gain altitude. This happens when you pass or circle through ridges or thermal air. The air is deflected upward, hence the lift. You can usually find this in mountain ridges. In the United States, you can legally fly up to 18000ft (5500m).
Part of paragliding training is an understanding of aerodynamics and weather conditions. Sufficient knowledge about these topics is crucial when making decisions while airborne and lowers the risk of emergency.
How Does Paragliding Decrease Altitude?
When you are ready to start landing, you can decrease your altitude in 3 different ways. These vary depending on the location, wind condition, and your skills and expertise. They are called the S-turn approach, Figure 8 approach, and U-turn approach.
- Figure 8 Landing Approach: As the name, you will make a series of figure 8 terms to lose altitude. It gets smaller and smaller as you get down and prepare for a final turn.
- S-turn Landing Approach: You lose altitude by making a series of s-turns within a cone of airspace. Like a cone, your turns get smaller as you reach the ground, preparing yourself for a final turn.
- U-turn Landing Approach: Also called the aspect approach, this is ideal for locations where it is surrounded by obstacles such as rocks and trees. What makes it even more challenging is you’ll have to know how fast your speed and altitude are in relation to the ground. Then, without taking your eyes off your landing spot, you will approach landing on one of its sides, determining the best moment to make turns.
Remember that the direction of the wind is a huge factor before proceeding to land. You have landed successfully when the decrease in altitude is stable and the speed is reduced to a minimum by applying brakes.
How Do Paragliders Get Down?
As a paraglider pilot, you get down by making a series of turns timed correctly to lose altitude. You also use the wind direction to your advantage. Therefore, having an understanding of the layout of the landing site is required.
Key tips when approaching final landing:
- Consider the wind direction when deciding where to land.
- Choose a landing spot. Coordinate with other pilots as necessary to avoid a collision.
- Begin descent by doing s-turn or figure 8’s.
- Keep the wing level steady as you get close to the ground. This helps achieve a smoother landing.
- Slightly apply tension on the brakes when turbulence is present.
- Reduce your airspeed to a minimum once you are ready to touch land.
- Keep your legs down to prepare for landing.
During training, your instructor will tell you when to make your turns. Then, as you get more comfortable in your glider, you will learn how to make your turns smoothly.
How Do Paragliders Land?
To land successfully, you take full control of the paraglider and use wind speed and direction to make your turns to descent. This is called the flare, where you eliminate your vertical and horizontal speed to achieve a soft touchdown. You can initiate this 6 to 9 feet (2 to 3 meters) above the ground.
Perform the flare by doing the following:
- On the final turn, keep your eye fixed on the target landing spot.
- Keep your arms up to increase the speed of the glider and slightly apply tension on the brakes as needed.
- You are ready to touch down once you are in an upright position.
- Reduce your speed to a minimum, then apply a 100% full brake before touching the ground.
Another option to descend faster is to flap the glider to lose performance and descend faster with the use of alternate braking. You can also collapse the wing at the moment of touchdown. These two options, though, are for more experienced paraglider pilots and not recommended for beginners.
Where Do You Land When Paragliding?
While there are many locations to paraglide, you can’t land with your paraglider anywhere. This is where having a flight plan and a landing spot in advance come in handy. Wherever you are, consider the following suggestions below when landing.
- Choose a landing spot free of debris, such as trees, rocks, and power lines.
- Only land on private property if you have permission. Otherwise, you’ll be reported, and all pilots paragliding around the area will be affected.
- Do advanced research. For instance, if landing near a residential area, check if there are permits required.
- Check the weather conditions in advance as you plan where to land.
- Try to avoid landing in thermal conditions, such as near the beach. It can be difficult to get a stable landing experience.
- Consider if the landing zone has a slope so you can plan well and make proper turns.
- Keep your eyes on the landing zone. Liftoff and landing are the most dangerous, so stay focused!
The best landing is always well thought of in advance and has a backup in place in case wind conditions are not favorable for your first location. Choose a landing zone with good weather conditions for a smoother experience.
How Much Space Do You Need to Land a Paraglider?
You won’t need a lot of space when landing a paraglider. It depends on the size of your glider, but generally, you will only need around 10 to 50 feet (3 to 15 meters) of space. Even though it doesn’t take a lot of room to land, as a pilot, you need to take into consideration the rate of climb. For instance, if there are trees, power lines, or any obstacle, you may need to add a room to them when landing.
Landing takes training, so only do this on your own when you have the knowledge, skill, and experience. During training, a landing zone is already provided, and your instructor will tell you when to make your turns to land safely.
What Is Top Landing in Paragliding?
Top landing is for experienced paraglider pilots as it requires skills and finesse. To put it simply, you strategize your landing approach by determining the flow of air. For instance, where the lift and the sink are and how high and fast you are towards the ground. Mastering the top landing approach will help you have better control and land on a more specific spot.
Ways to achieve top landing:
- Start by determining the flow of air, wind speed, and direction.
- Strategize your landing approach by checking if you have enough height to reach your spot and turn into the wind. If you are too high, chances are you will overfly. If you are too low, there is a higher chance of injury and damage to your equipment.
- Start by heading at a shallow angle with just enough downwind to allow for your planned trajectory to the landing zone.
- Have good control of airspeed by not slowing down too much and not going too fast.
- Be ready to flare as you reach the ground.
- Once on the ground, remain focused on the control of the wing to avoid it from dragging you.
Top landing is best in slope areas free from power lines, trees, and rocks. It can be difficult to achieve, hence requiring more experience. Once you get the hang of top landing, you’ll see that you are closer to your landing spot each time and have better control.