As an owner of a stand up paddle board, taking care of your board along with other paddle boarding equipment is a responsibility that you have to fulfill and commit to. You have spent quite a considerable amount of money on your stand up paddle board, so you surely want to guarantee that it is well maintained to keep it functional and in excellent condition for a very long time. Every once in a while, your board will need a little care and attention to make sure that it won’t be worn out in the blink of an eye.
How Do You Pump Up a Stand Up Paddle Board?
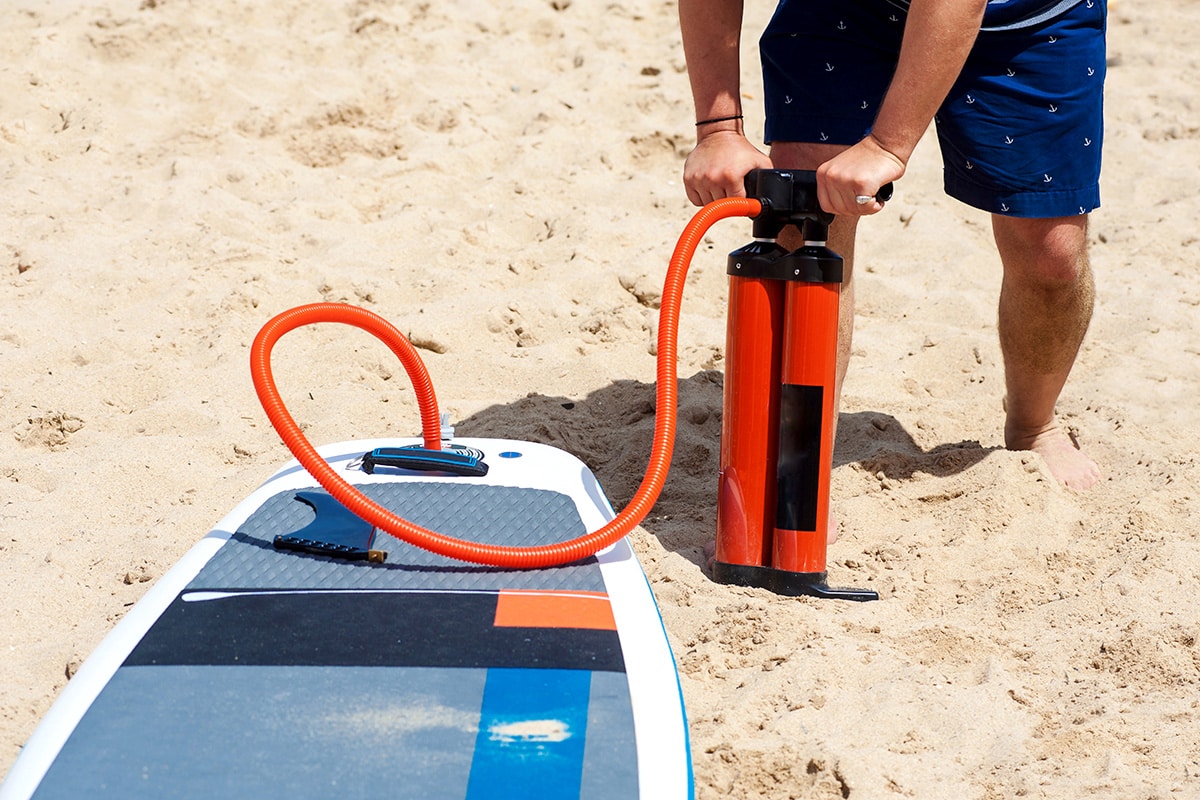
An inflatable paddle board of average size only takes about 5 to 10 minutes before it’s pumped adequately to the right level. You can either use a hand pump or an electric pump, whichever you feel more comfortable working with. Here are the three easy steps you need to do to pump up your stand up paddle board:
- Connect your hand pump or electric pump to the valve of your stand up paddle board.
- Pump to fill your board with enough air until you reach the recommended PSI level for your stand up paddle board.
- Once you achieve the desired PSI level, seal the valve securely to avoid air leaks and get ready to set out to the beautiful marine environment waiting to be explored!
Pumping up a stand up paddle board may seem like it’s a lot of work, but it’s actually a straightforward job that you can finish in no time. If you purchase a stand up paddle board, it usually comes with a hand pump along with a pressure gauge, a washer, and a hose which saves you a lot of trouble because you don’t have to search where to get one. If you want to save some energy, you can get an electric pump to do the work for you with just a single press of a button.
How Long Does It Take to Inflate a Stand Up Paddle Board?
On average, it will only take you about 5 to 10 minutes to successfully finish inflating your stand up paddle board with air through the use of a hand pump. As mentioned earlier, if you buy a stand up paddle board, you usually get a hand pump along with a board which means that you don’t need to spend another penny to buy one. On the other hand, if you prefer using a good quality electric pump better, it will take you no more than 5 to 8 minutes before your board is inflated to the right PSI level.
You are given the option to choose between hand pumps and electric pumps, so make sure to select which of the two suits your needs and wants best. In addition, it’s also vital to know that the time it takes to inflate a stand up paddle board is greatly affected by a few factors. Listed down below are the several determining factors that you must take into consideration:
- How fast you fill the board with air
- The kind of pump you are using
- The size of the board you are inflating
How Do You Clean a Stand Up Paddle Board?
In most instances, cleaning your stand up paddle board can be easily done using a garden hose and mild soap combined with water. It is unnecessary to clean your board after each paddle boarding adventure but doing so will certainly keep it in excellent condition and make it last a lot longer. With that said, listed down below is a step-by-step guide on how to keep your board free from dirt:
- Rinse: Start by rinsing your whole board with water to get rid of dirt, mud, grass, gravel, dust, or any debris sticking to it. If you are paddling in saltwater, it is very important to rinse it with water to prolong your board’s lifespan, given that salt will slowly wear down the materials used in your board’s construction while weakening its seams. However, you do not need to rinse your entire board after every paddle boarding session in freshwater except if you want to remove debris.
- Clean with mild soap: A mild dishwashing soap solution combined with warm water can be used in cleaning your stand up paddle board. If mild dishwashing soap does not do the job, paddlers recommend using Onit Pro Blue Goo as it is proven to be an eco-friendly and effective product that also shields the materials used in making your board from UV rays. Using an extremely soft-bristled brush, scrub your board lightly to avoid causing scratches.
- Remove marks or stains: To eliminate stains, you can use non-abrasive PVC cleaning products that are gentle and will not harm your stand up paddle board. Baking soda, mold removers, oxygen cleaners, all-purpose cleaners, and magic erasers are some of the most popular harmless products used to clean your board’s PVC material. Still, these are not to be used on the deck pad. Use a gentle natural soap or a deck pad cleaner mixed with water to give the deck pad a light scrub using a brush with incredibly soft bristles.
- Rinse: After cleaning the board and removing stains, proceed to rinse the board with water thoroughly. This will remove the build-up of dirt you gathered while cleaning your board, including the remaining soap products.
- Let the board dry: Your stand up paddle board will usually dry completely if you let it sit under the sun for around 10 to 20 minutes. Any more than this time period will ruin your board because prolonged exposure to extremely hot temperatures and UV light will cause your stand up paddle board to grow weaker. This is why even though leaving your board under the sun’s heat for about 10 to 20 minutes is fine, some people still prefer drying their board using a towel to lengthen its lifespan by preventing the materials from deteriorating.
Just like any equipment used in other watersports or any sport for that matter, your stand up paddle board will last longer if you take good care of it. As you use your paddle board more and more frequently, it will eventually have a few scratches, stains, and dings, but it is surely nothing to be worried about since this is completely normal. Thankfully, you can make your board function better, last longer, and look cleaner by maintaining it properly.
How Do You Deflate a Stand Up Paddle Board?
After an enjoyable paddle boarding session out in the water, some people like to keep their boards inflated. However, if you do not want to keep your stand up paddle board filled with air after using it, you can absolutely deflate it. There are a few methods to deflate your board which includes the following:
- Let the board sit and wait for a few minutes as the air comes out of the board by itself.
- Rinse your board: Before deflating your stand up paddle board, always make sure to wash it with water to get rid of any dirt left on your board.
- Dry your board: Dry the board entirely especially the valve area, to prevent water from entering the inside part of the board.
- Begin deflating the board: To start the deflation process, take off the valve’s cap and apply some pressure to push the valve pin downwards, then twist and lock it in the open position to let air come out. During this process, you will hear a loud hissing sound as the air comes out of the board speedily. It’s nothing to be startled about because this is totally normal.
- Roll your board: Once almost all the air is out of your board, you can now begin to roll your board up. It is best to roll starting from your board’s nose up to its tail because this gets the air left inside more efficiently with less difficulty. Most boards come with a strap that you can use to keep your board nicely compact.
- Pack up: After rolling your board up, all you need to do is put all of your stuff back into your bag then you can head home to get some rest!
- If you own an electric pump, use it to suck the air out of the board.
How Long Does It Take to Deflate a Stand Up Paddle Board?
Like inflating your stand up paddle board, the time it takes before your board is deflated takes about no more than ten minutes. Within this short time, you can empty your stand up paddle board of air and finish packing it back into your bag at the same time. On top of that, you can also save a lot of time by doing other things such as changing into a dry and clean set of clothes because the air will come rushing out of the board on its own at a very fast pace once you lock the valve pin in the open position.
Some hand pumps have an in and out valve, and you can use the in valve to let the pump suck any excess air out of your stand up paddle board. Fully deflating a stand up paddle board does not take very long, and it is also a fairly easy process that does not require you to exert a lot of effort. Even if it is your first time deflating your stand up paddle board, it will not be difficult for you to do an excellent job of emptying it with air.
How Do You Fold a Stand Up Paddle Board?
Here’s a step-by-step guide on how to properly fold a stand up paddle board without damaging any of its parts once you finish deflating it:
- Roll or fold: The best way to roll or fold your stand up paddle board is by starting from the nose then slowly working your way up to the tail where the valve is located. Through this method, you can push excess air left inside of your board out of the valve.
- Protect the fins: As you roll your stand up paddle board, you are getting closer to the tail, which means that you are also getting closer to the fins on the back of your stand up paddle board. It would be best if you always folded your stand up paddle board in a way that the fin attachment plates remain completely flat. No matter what happens, do not roll or fold the fins to avoid causing any damage and make them last for much longer.
- Get rid of remaining air: Once you have gotten out most of the air through the valve of your stand up paddle board and the remaining air inside cannot be pushed out anymore, it is now time to make use of your hand or electric pump. Hand pumps have an “in” mode that can suck excess air out of your board very quickly. On the other hand, electric pumps also suck excess air out of your board a lot faster without actually having to pump it yourself.
- Close the valve pin: Now that your board is totally flattened and almost all the air is out, you can proceed to setting the valve pin in the close position. Closing the valve prevents air from entering inside your board.
- Put the dust cover on: After you have finished closing the valve pin, you must always put the dust cover back on so dust cannot go inside your stand up paddle board.
- Strap your board: Your stand up paddle board is now flat and rolled up nicely, so it is time to wrap the strap around it. After wrapping the strap around your board, put the strap through the clip and tighten it back down just enough to keep the board nicely compact. You are now done folding your stand up paddle board and you can carry on to putting it back in your bag and storing it wherever you want to, such as inside your car, garage, closet, etc.
The most critical part of folding your stand up paddle board is getting most of the air out of it because this flattens your board and makes it significantly easier for you to fold or roll it up. Overall, it is a pretty simple process that can be done in a short amount of time without having too much difficulty. Like with all things, folding your stand up paddle board takes practice, but it will not take you a long time before you get the hang of it.
How Do You Pack a Stand Up Paddle Board?
Packing a stand up paddle board is a fairly easy thing to do that is incredibly helpful, especially if you like to take your board to different paddle boarding spots across the globe. The key to smooth and uncomplicated packing is having the essential equipment consisting of just two things—a good pump and a sturdy storage bag. To pack a stand up paddle board, follow these few simple steps:
- Start by cleaning your board: Whether you plan to go on a fun and relaxing vacation to do some stand-up paddle boarding or just want to pack it up and store it somewhere, it is always a smart idea to give it a good wash. Doing this will ensure that your board is squeaky clean and in excellent condition before packing it away. As much as possible, do not skip this part of the process as it will have a significant impact on the health of your board, especially if you are packing it to store it away for a rather long time.
- Begin with the deflation: Get rid of the air inside your board by pressing the valve pin downwards and locking it in the open position to let the air go out by itself. Once most of the air is out, use a hand pump that has an “in” mode to suck the extra air left inside your stand up paddle board instead of filling it up. If you have an electric pump, simply connect the hose to your board’s valve and let it do the job of emptying your board of air to save a little bit of your energy.
- Proceed to folding or rolling: Now that your board is completely flat and free of air, it is time to fold or roll it up. To get the best results, you should start rolling your board from the nose to the tail since this method pushes excess air inside your board out through the valve. Whatever the circumstances, it is very important to remember that you must always fold or roll your board so that the fin attachment plates are kept flat to avoid damaging it or, even worse, breaking it.
- Strap it down: Once you finish folding your stand up paddle board, you need to strap it down at all times to keep it nice and tight. Wrap the strap around your board, put it into and out of the clip, then tighten the strap just right to keep it tightly packed. Avoid tightening the strap too much because this might damage your board, and nobody wants that.
- Pack everything up: Your board is now ready to be packed inside a nice, board-friendly storage bag. Even though storing your stand up paddle board in a regular bag is fine, investing in a good quality paddle boarding bag is absolutely worth it, especially if you often visit various paddle boarding destinations around the world. This will make your travels hassle-free while keeping your board protected from different weather conditions.
How Do You Mount a Stand Up Paddle Board?
Mounting a stand up paddle board generally follows the same steps whether you are mounting from the shore or a dock. You start kneeling on the board and then make your way to stand up once you are balanced. Listed below are steps to mount a paddle board from the shore and dock, respectively.
Mounting a stand up paddle board from the shore:
-
- Put your SUP in the water: Make your way into the water and stand beside the board’s right or left side, whichever side you feel most comfortable on. Ensure that the water is deep enough to prevent the fins from touching the ground beneath the water. It is best to have your knees at about the same level as the water’s surface.
- Place your paddle in a horizontal position: Place the paddle on top of the board’s deck horizontally. The grip of the paddle must be on the side of the board where you are standing. The blade, the other end of the paddle, must be on the other side of the board, touching the water.
- Hold both sides of the board: You will be holding the sides of the board as well as the grip of the paddle using your hand right hand if you are standing on the right side of the board while your left hand holds the opposite side of the board. On the contrary, use your left hand to hold the paddle’s grip if you are on the left side of the board while your right hand has the other side of the board. Doing this will help you stabilize your weight as you mount the board.
- Lift one leg first: Carefully lift your left leg first if you are standing on the right side of the board. On the other hand, slowly lift your right leg first if you are standing on the left side of the board. Gently place your knee in the middle of the board where the handle is installed.
- Lift your other leg: After you place one knee on top of the board, maintain your balance as you lift your other leg, then place your knee on top of the board. With both of your knees resting on the board, your body weight should be quite stable while you maintain a kneeling position.
- Make a few adjustments: If your board’s nose is slightly tilted upwards, you need to move forward a bit. On the flip side, if the tail of your board is somewhat tilted upwards, you need to move backward a little. Adjust your position as needed so that your stand up paddle board is floating stably in the water completely flat. It is also highly recommended to perform a few paddle strokes while you are in the kneeling position to know if you are stable enough.
- Stand up from the kneeling position: If you do not want to maintain the kneeling position, you can begin to stand up, place the paddle horizontally in front of you, and hold onto it. Slowly move one foot up, followed by your other foot, while maintaining your balance until you are fully upright. Make the needed adjustments by placing both of feet in the middle of the board where the handle is located.
- Start paddling: To help you keep your balance on the stand up paddle board, bend your knees a little and keep your core centered and slightly engaged. You can start doing paddle strokes now that you are comfortable and stable on top of your board.
Mounting a stand up paddle board from a dock:
-
-
- Put your leash on: The very first thing you need to do before anything else is to put your leash on. Doing this will prevent your stand up paddle board from moving away from you or being blown away from you, especially if the wind is extremely strong. Once your leash is correctly attached to your SUP, you can begin mounting the board.
- Kneel, crouch, or sit on the dock: Start by holding the handle installed in the middle of your board using both of your hands to carry it. Carrying it with one hand is totally fine, but using both of your hands to lift it will give you more control, allowing you to put your board in the water carefully. Now that you are carrying your board, start kneeling, crouching, or sitting on the dock, whichever position you feel most comfortable doing to make placing your stand up paddle board in the water a lot easier.
- Put your board in the water: The next step is to put your board in the water slowly and carefully to avoid causing any damage by hitting it against the dock. Slightly tilt your board and put the nose of the board first in the water. After that, lay the entire board on top of the water with great care.
- Place your paddle: Your board should now be nicely flat and floating in the water so you can proceed to place your paddle on top of it. When placing your paddle, position it vertically at the center of your board to avoid taking up space on the deck pad, thereby making room for your knees. You can also set your paddle horizontally, but this will be a little harder because you are close to the dock and do not have enough space, so placing it in a horizontal position is the best option.
- Stay low and get ready to mount the board: While still staying low, sit on the edge of the dock and place both of your feet on top of the board. Place both of your feet at the middle of the board where the carrying handle is installed. Get ready to begin mounting the board afterwards.
- Put one knee on the board: Rotate your torso a little, then carefully put one knee down on top of the board. As you put one knee down, place one hand on the board with your palm facing down and use your other hand to hold onto the dock to maintain your balance. Be careful not to push yourself away from the dock as you might fall into the water given that you are not yet fully on the board.
- Put your other knee on the board: After successfully putting one knee down, put your other knee on the board while still keeping your balance. Use your weight to lower your whole body down on the board. You should now be in a kneeling position on top of your board.
- Position yourself at the board’s center: Before moving onto the next step, you must first make a few adjustments to position yourself at the middle of your board. Have a feel if your body weight is evenly distributed across the board. This will ensure that you will not fall off once you set out to the ocean.
- Push off from the dock: You have now fully mounted your board with your weight evenly balanced. Once you feel comfortable on top of your board, gently push yourself away from the dock using one hand while sitting or kneeling.
- Begin paddling: Take your paddle out from in between your legs and grab its grip. You should now be far away from the dock, so it is time to start paddling. You can stay in the kneeling position or carefully begin to stand up to perform paddle strokes.
-
How Do You Lock and Secure a Stand Up Paddle Board?
When purchasing a paddle board lock, it usually comes with a complete security kit that is consisted of a cable with a combination lock, the cleat, the jaw, and the paddle lock. The best and most popular paddle locks that many people use are the ones made by DockLocks because they are incredibly easy to use and thoroughly designed to protect your stand up paddle board. Follow these four simple steps to lock and secure your stand up paddle board:
-
-
- Choose where you want to clamp the jaw to your stand up paddle board be it the fin box or the leash plug.
- Thread the cable by inserting it through the loop on the jaw.
- Lock the cable to a firm and secure objects such as trees, bicycle stands, docks, and other sturdy things to ensure that it will not get stolen by anyone.
- Set your code.
-
A paddle board lock is a necessity, and it is undoubtedly one of the most important accessories that a paddler should have because this keeps your board secure when you are not around to look after it. The last thing you want to happen is to leave your board someplace unattended for a very short while, then come back to it only to know that it has already been stolen. Paddle board locks can be a bit expensive, but it is definitely worth it to buy one, and it is certainly better than losing a much more costly item—your board.
How Do You Transport a Stand Up Paddle Board?
Transporting paddle boards is not a hard task to accomplish, but it is of vital importance that you always make sure to do it the right way so that your board will not be damaged. There are multiple ways to properly and safely transport a stand up paddle board and the most common way is through vehicles such as trucks, vans, SUVs, etc. Here are the three simple steps on how to transport your stand up paddle board:
-
-
- Carry: Stand up paddle boards commonly have a handle that can be found at their center. Handles make it a lot easier for you to carry your board. To carry your board, start by bending your knees while keeping your back straight to pick up your SUP, then place it between your arm and body to keep it tucked in place.
- Place: Put your stand up paddle board inside or on top of your vehicle. If you have a truck, your board can easily fit on the platform located at the back of it. It is also very important to lay some padding down on top of your truck’s tailgate to avoid harming your stand up paddle board. However, if you own a small vehicle such as sedans, SUVs, minivans, or station wagons, your only choice is to place your board on the roof.
- Secure: Once you have placed your stand up paddle board on top of your vehicle’s roof, you must ensure that it is tightly strapped down to prevent it from falling onto the ground once you get moving. Below is the few essential equipment that will massively help you in securely placing your board on top of your vehicle:
- Cam straps: Using cam straps is the quickest and most straightforward way to keep your board in place. You will need cam straps that are long enough to cover the length of your board since there are many different stand up paddle board measurements available in the market. Most SUP boards are about 10 to 11 feet, so two cam straps that are 12 feet long will usually do the job for you but buying ones that are even longer is completely fine.
- Crossbars: Some car manufacturers produce vehicles that have bars installed on top of their roofs that run from the front to the back. You can attach crossbars to these parallel bars. This makes it easier for you to ensure that your board will not fall off.
- Rack: If your vehicle does not have a roof rack, you can definitely purchase one. There are roof racks specifically made for stand up paddle boards that make your travels go smooth and easy. Roof racks are extremely helpful in keeping your board secure, and you should certainly invest in one, especially if you often transport your stand-up paddle board to various places.
- Bow and stern lines: In simple terms, a bow line is a line of rope or strap that runs from the front of your board to the front of your vehicle. A stern line is a line of rope that runs from the back of your board to the rear of your vehicle. Putting bow and stern lines is a great way to add extra security in preventing your board from falling down the road and running uncontrollably fast into another person’s vehicle. Whether you are traveling at low or high speeds, it is always a good idea to use bow and stern lines just to be extra safe.
-
How Do You Transport Two Stand Up Paddle Boards?
If you need to transport two stand up paddle boards because you are traveling with someone else or simply want to bring two of them, you must learn how to do it correctly. It is not hard to keep your stand up paddle boards safe when transporting them, but you must do it the right way to stay away from unwanted dangers or accidents. Follow this detailed step-by-step process to guarantee that your boards will not fall off and get damaged once you hit the road:
Purchase the necessary equipment:
-
- Crossbars and roof racks: There are roof racks particularly built for making the process of transporting paddle boards a significantly easy thing to do. Before you purchase one, ensure that you get the correct crossbars and roof racks for your vehicle. Covering the crossbars with a cloth of some kind is a brilliant idea to avoid scraping your stand up paddle boards.
- Straps: It is best to get locking straps because they come with a metal buckle on one end that you can use to secure the straps. This ensures that your board is locked in place and will not fall off while you are driving. Cam straps are a popular option because they are easy to use which means that you can finish strapping your board down faster.
Place the boards on the roof racks on top of your vehicle:
-
- Lay the longest board: Now that you have the essential equipment, it is time to proceed to laying your two stand up paddle boards on top of your vehicle. If your boards are not the same length, lay the longest board first on top of the roof rack with its fins facing up at the front of your vehicle. Do not rush yourself as you delicately lay the board down to keep it nicely flat and centered.
- Lay the second board: Lay the second board down on top of the longest board, making sure that its fins are still facing upward towards the front of your vehicle. Make slight adjustments during this process because you must lay the second board in a way that it does not go directly above the first board’s fins. It is highly suggested to put a padding of between the two boards to prevent causing scratches or any other kind of damage for added protection.
Secure both boards on top of the vehicle:
-
- Thread a locking strap under the back crossbeam: You can begin threading the free end (the one without the buckle) beneath the back cross beam on either the right or left side of your vehicle. Afterwards, give it a nice tug to make sure that both sides have the same length.
- Take both sides of the strap over: Start by gently tossing the free end over to the other side. Just walk to the other side, taking the buckled end along with you instead of throwing it because it might hit your vehicle. Make sure that both straps are laid flat on top of the two boards.
- Thread the free end on the other side: Before doing this, loosen the free end of the strap by pulling it just a bit to create some slack. Keep in mind not to pull too much because the opposite side of the strap might untangle. After that, run the free end underneath the back crossbeam on the other side of the rack.
- Insert, tighten, and lock the buckle: Proceed to insert the free end of the strap through the tiny space just above the buckle. Once successfully inserted, pull the free end until the strap is tight enough to keep the boards in place, then lock the buckle by pushing the tab downwards.
- Follow the same steps in strapping down the front part of the board: Ensure that the strap goes at the back of the fins when securing the front side of the board. Now that the board is fully secured on top of the roof rack give it a little shake to test if the straps are tight enough. If it looks like the boards will possibly fall off, tighten the straps even further or add a bow and stern line for extra safety.
Connect the safety strap for further security
-
- Open the rear doors of your vehicle: Begin by opening both of your vehicle’s back doors. You will attach the additional safety strap inside of your car, so you must keep your rear doors open. Just to be even more cautious, adding another safety strap will be of tremendous help in keeping your board more secure.
- Hold the buckled end of the safety strap: While you are holding the end of the strap with the buckle, toss the free end of the safety strap lightly over both boards. Afterwards, get in your car, take the safety strap’s free end from the other side of the car, and pull it towards you.
- Tighten the safety strap: Now that you are holding the free end and the buckled end of the safety strap in both of your hands, put it through the tiny opening located just above the buckle. Pull the free end again to create just enough tension so that the safety strap keeps both of your stand up paddle boards in place.
- Lock the buckle: The next thing you need to do after tightening the safety strap is to lock the buckle. Doing this will ensure that the safety strap will not come out of the small opening where you put it through. To lock the buckle, simply push its tab downwards using your fingers.
- Close both rear doors: Your bored is now extra secure on top of your vehicle, but closing your doors will keep it even more secure while you are on the road. Even if the buckle unlocks, your boards should still stay in place. However, do not take chances if something like this occurs. It is extremely dangerous if your board falls off while driving, so park your car on the side and lock the buckle again.
Stand up paddle boarding is well known to be an exceedingly pleasurable and relaxing activity that will make you forget about the worries of life, even if it is just for a short while. It is a relatively easy sport to learn, and most of its trouble lies in transporting your equipment (board, paddle, pump, leash, etc.) especially if you do not know how to do it properly and efficiently. Whether you are transporting one, two, or multiple paddle boards, it is of the utmost importance to do it the right way so take the time to educate yourself about the process.
How Do You Fix a Stand Up Paddle Board?
Once you start paddle boarding, your board will inevitably get scratches and dings. Taking it to the shop for repairs is good, but you might need to learn how to repair minor stand-up paddle board damages sooner or later. Learning this skill will save you money in the future! Listed below is a step-by-step SUP repair to help you patch up your board and get back in the water in no time!
-
- Know your SUP: Stand-up paddle boards are built of a variety of materials, which affects how they are repaired. Because they are lightweight and affordable, foam SUPs are the most popular form of paddle board on the market. PVC is also used as SUP a material. Determine which one your board is made of before starting repairs.
- Inspect your board: You won’t fully see the dings and scratches until you clean your paddle board thoroughly. You should also check the damage. If it’s a minor scratch or dent, you can definitely repair it on your own. However, if the damage has something to do with the foam core, you might want to take your board to the shop for repair. If your case is the former, rinse your board and make sure it has dried completely before repairing it. You don’t want to seal a board with water still in it!
- Gather repair materials: Purchase a repair kit. Repair kits are sold as a set, so it’s best to purchase to save money and time if you’re a beginner. Kits typically include putty, which can either be pre-mixed or you can do it yourself, and 60 – 240 grit sand paper for cleaning the dents before repair.
- Remove the compression screw: First and foremost, the compression screw on a SUP must first be removed before it can be repaired. Never forget this step as it is very crucial! A change in air temperature might alter the pressure inside the board, resulting in further damage. If the screw is left in, it will be very hard to repair the board because air will enter via the dent or hole.
- Clean the surface: Assuming that you have washed, cleaned, and dried your paddle board thoroughly, it is time to clean the dent. The hole in your board must first be cleaned and prepared. If there is any loose and cracked fiberglass, clean this area. You can use a utility knife and sand it down.
- Use the repair kit: If the damage in your board is very minor, you can just use tape to seal small cracks, but if we are talking dents, you’ll need to whip out your epoxy repair kit. Mix the epoxy with the chemical if it hasn’t been pre-mixed already. Then, apply the epoxy evenly on the damage and cover the dent.
- Sand the surface: Take your board out and let the epoxy dry in the sun for a few minutes. There is no set time since it varies on how big the damaged surface is. Once the epoxy is fully dry, use sandpaper to smooth out the epoxy and retain the shape of the paddle board. You can even spray paint the epoxy surface to match the original color of the board.