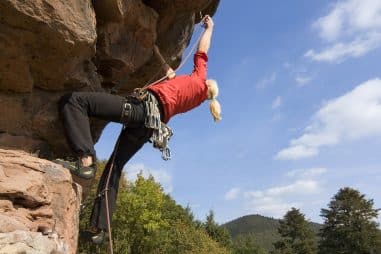
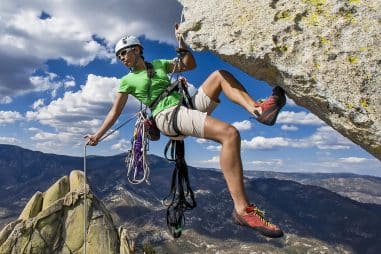
This equipment combined together forms a rappelling system wherein one can climb and descend steep rock faces that otherwise would be too difficult to navigate. In this article, we are going to discuss the specific use of each component in rappelling.
What is Needed to Start Rappelling?
The following list is the recommended minimum equipment for rappelling. This list includes some extras as the additional cost will be minimal. You may add to this list as you see fit for your needs.
- Static rope, 10 or 11mm diameter, 60 meters long, will be used only for ascending or rappelling. A single dynamic rope would be needed if climbing and belaying will be involved
- Climbing harness with loops for extra gear and belaying loop
- 3-4 large locking carabiners
- A climbing helmet
- Extra rope for Prusik back-up
- Rappel device
- Sling for use as personal anchor system
- Anchors
What Kind of Rope is Used for Rappelling?
In general, two types of rope are used for rappelling. In both cases, a 10- or 11-mm diameter rope is used. The “static rope” is used when ascending and rappelling. This type of rope does not stretch and is ideal when rappelling or climbing. The “dynamic” type has some stretch and is used for belaying and climbing. The stretch comes in handy when the climber unfortunately falls, and the rope will stretch a little, so the climber does not come to a sudden stop and be injured.
The standard rope length usually is 60 or 70 meters. Some rope comes in two colors, the change in color marking the halfway point of the rope. This is very helpful when double rope rappelling since you can easily recognize the rope’s midpoint and will not need to keep on checking if the rope’s length is equal on both sides. It is also helpful to have different colored ropes, especially when you need to extend the rope’s length. This makes it easy to identify the rope’s ends when untying the knots later on.
Can You Use a Dynamic Rope for Rappelling?
Yes, a dynamic rope can be used for rappelling, but it is not really designed for that purpose and is not suggested. Since the dynamic rope has some stretch to it, it won’t help if you are bouncing on the rope during the rappel due to the “give” of the dynamic rope. In fact, this would be an unwelcome motion as this puts additional strain on the anchors and the system as a whole.
The dynamic rope is used mainly for climbing for the reason cited previously. Maintaining a suitable tension on a dynamic rope during rappelling can be challenging. This is why a static rope is recommended for rappelling.
How Do I Get My Rope Back After Rappelling?
When double-strand rappelling, the rope is threaded through the anchor, and you rappel on two strands of the rope. This is the most common rappelling technique. When you get to your next rappel station, you remove the rope from your rappel device and pull on one end. The other end of the rope will simply snake through the anchor, and you will have your rope back.
If you are rappelling on a single strand, you can use a pull cord to retrieve your rope upon reaching your next rappel station. A pull cord is a smaller diameter rope that you can tie to the other end of your rappelling rope. This end of the rope has an object larger than the ring through which the rope passes that prevents the rope from slipping through the ring. After your rappel, you pull down the pull cord, and the rappelling rope will slip through the ring. There are other advanced but dangerous methods of retrieving the ropes to leave those techniques to the professionals.
What is a Rappel Ring?
A rappel ring is a circular piece of metal you can attach to a “hanger” when rappelling. The rappel ring can be made of stainless steel, titanium, or aluminum. The stainless-steel or titanium ring will cost a bit more than the aluminum, but it is also stronger and can carry more weight. The aluminum rings will be cheaper and lighter but will also wear out faster. Some manufacturers of aluminum rings use aluminum alloys that come close to the carrying capacity of the stainless-steel ones.
Rappel rings come in different sizes and strengths. The rings are rated with strengths of about 10-15 times the average climber’s weight. Having said that, the following list can serve as a guide in ensuring that the rappel ring will be safe to use.
- Avoid the aluminum hollow-type rings as they tend to wear out quickly.
- Ideally, the rings should not have welds or gaps. If it does have welds, inspect it carefully to make sure of its integrity.
- Go for the well-known brands of rappel rings. There is a good reason why they are well-known in the first place. You may pay a little more, but it will be worth it.
- Do not use an oval-shaped ring. It has already failed and should be discarded and should not be used anymore in rappelling or climbing.
- Inspect the ring for grooves or sharp edges. This will damage the rope and may cause it to break prematurely.
What Are Rappel Rings Used for?
Rappel rings, although named as such, do not necessarily mean they should be used for rappelling. In fact, some companies explicitly state that their rappel rings should not be used for either rappelling or belaying. What then should the rappel ring be used for if not for rappelling?
After acknowledging the manufacturers’ disclaimer, the rappel rings can definitely be used for rappelling as well as for other applications in climbing sports. It’s important, however, that the rappelling rings are used in the right way. Another application of the rappel ring is for building anchors in combination with hangers. You can use rappel rings to attach your PAS (personal anchor system) or a hammock if you want to rest while rappelling. The rings will prevent the rope from wearing through the anchor. They can also be used as belay devices if one is not available.
How Do You Use Rappel Rings?
One way to use the rappel rings is to combine them with webbing to build an anchor. Slip the webbing through the ring before fixing the webbing to a suitable tree or rock. Simply thread the rope through the ring, and you are ready to use it for rappelling. The ring will prevent the rope from sawing through the webbing and cause it to fail.
You may also use the rappel rings in combination with hangers to build anchors for rappelling. Again, the rope should be threaded through the rings to protect it from rubbing against the sharp or narrow edges of the hanger. The rings may also be used for belaying in emergency situations, and no belaying loop is available. Attach the ring to the locking carabiner of the harness, thread the rope through the ring, and serve as a makeshift belaying loop.
How Many Carabiners Do I Need for Rappelling?
The minimum number of locking carabiners you will need for rappelling will be three, although it wouldn’t hurt to bring more. The first one will be for attaching your harness to the rappel device. The second carabiner will be for your back-up prusik. The third carabiner will be attached to your personal anchor system. Carabiners are used for diverse climbing tasks. It is used to attach a climber to a rope for rappelling, attaching a climbing rope to a harness or piece of gear, and attaching a climber to a belay anchor.
Carabiners come in different types according to:
- Shapes: Oval, D-shaped, or asymmetrical D-shaped
- Gate type: Straight and bent gates, wire gate (which is never used for climbing sports)
- Locking: Screw-locking and auto-lock, which locks automatically when closed (duh!)
How Do You Rappel With a Single Carabiner?
What do you do when you lose or drop your rappel device, and you can get down only by rappelling? To make matters worse, you have only one carabiner to spare. This is the time to use the Munter hitch method, rappelling using only one carabiner to serve as a rappel device. This is a last-resort method used only in the worst situation as described above. The Munter hitch can also be used as a belaying device in an emergency.
The Munter hitch is formed by holding the rope with both hands face down in front of you. Your arms should be crossed when holding the rope. Uncross your arms and bring your fists together as in a fist bump. Bring the two loops formed together and clip them to the carabiner. A pear-shaped carabiner works best for this due to its wide basket. The rope should slide freely in the carabiner when it is done properly.
How Do You Rig a Carabiner for Rappelling?
There are several ways to rig carabiners for rappelling. One way is described above as the Munter hitch method when you only have one carabiner. Another one is the carabiner brake method which uses 4-6 locking carabiners. Both methods can be used for single-strand or double-strand rappelling. A step-by-step guide to assembling a carabiner brake is described below.
- The locking oval-shaped carabiner is best suited for this system. Since they have the same configuration and dimension on both sides, the ovals are easier to rig correctly.
- Start by clipping two carabiners to your harness’ belay loop. Make sure that the locks of the two carabiners are on opposite sides. The locks should form an X when you open them so they cannot accidentally open at the same time.
- Now, clip two other carabiners to the ones already attached to your harness. Again, make sure that the locking gates are opposed. This is called the carabiner frame.
- Push a loop of your rappelling rope through the second set of carabiners. This can either be a single-strand or double-strand.
- Take the other two carabiners and clip them across the carabiner frame with the loop above the carabiners. Again, the locking gates should be opposed to each other. Pull the rope down, and you are ready to rappel on your carabiner brake. But first, double-check your carabiner brake system before committing yourself to it.
- You may add another set of frame and brake carabiners if you want more friction to slow down your descent when you rappel.
Can You Rappel With a Belay Device?
Today’s belaying devices are versatile enough to be used as rappelling devices as well. The ATC or Air Traffic Controller manufactured by the Black Diamond has been the most commonly used belaying/rappelling device. In fact, the ATC has been the dominant type of such device that is become synonymous with rappelling devices.
Broadly speaking, there are three types of belay devices, the figure-8, the assisted braking device (ABD), and the tubular type (this is the ATC-type device). Since the ATC-type is the most common, we will discuss how it can be used both as a rappelling and belaying device. It can also be used for either single-strand or double-strand rappelling/belaying.
How Do You Use Belay Rappel?
The following general steps should be observed in using the belay rappel:
- Create a suitable anchor either from natural features such as a tree or boulder. If it’s not available, you can build an anchor system from your gear.
- Step into your harness, making sure to secure the waist belt and leg loops.
- Now, thread the rope through the ATC and secure it with a locking carabiner to keep it in place. If you are using an ATC with a high-friction side, make sure this is on the side of your braking hand.
- Then you attach your harness or PAS to the carabiner attached to the ATC.
- Before rappelling or being belayed, make sure to attach a back-up to your system. This can be prusik rope or some other type of your preference.
- You may now slowly back down the slope, making sure to test that the system is working correctly before committing yourself.
How Do You Rappel Without a Belay Device?
Rappelling without a belay device can be done in a number of ways. The following techniques would serve if you find yourself dropping or losing your rappel device during a climb. Two of the techniques in rappelling without a device have been discussed here previously. Technically speaking, using the carabiner method or the Munter hitch qualifies as having a rappelling device, although admittedly, it is a makeshift one. Below, we will discuss rappelling only with a rope and no other aid to go down a cliff or a bluff in an emergency.
The following methods have some common elements that need to be followed when descending with only a rope. First, you need to use only a static rope. A dynamic rope would not be very comfortable in this instance due to its elastic properties. Then you should not carry any gear with you that might cause you to lose your balance or weigh you down while rappelling. Lower your equipment down to the next station except for what you will need to execute the rappel.
The first method of rappelling without a device is called the Swiss seat. This method uses only ropes and a single carabiner. I know it’s not precisely rope-only, but it’s close enough.
- Cut a 5 to 6 meters length of rope, preferably a 10 or 11mm rope. You will use this to fabricate a “seat” or harness.
- Start by passing the rope around your waist. At your front, knot two half-hitches and tighten.
- Pull the two strands below your legs. At your back, pass the ends over the rope across your trunk and create a half-hitch on each side.
- Pull the ends of the ropes towards your front and tighten. You now have your “seat.” Gather the free ends of the rope and tie it off. Keep it out of the way by putting it in your pocket or clip it.
- Attach the carabiner and use a Munter hitch to rappel.
The first rope-only method of rappelling is the South African technique.
- First, loop the rope through your anchor, a tree, a boulder, a rock, anything that won’t come loose when you put your weight on it when you rappel.
- Facing the anchor, take both ends of the ropes and pass it below your armpit.
- Cross the ropes at your back and bring it in front of you still under your armpits.
- Now, pull both ends of the ropes between your legs towards your back. If you’re right-handed, hold both strands of the rope firmly in your right hand. This is your braking side. You control the speed of your descent using this end of the rope.
- Your other hand should be holding on to the rope from the anchor for balance.
- You may add a prusik knot as a back-up to this system.
The other method of rappelling using only a rope is called the Dulfersitz Rappel Method. You do this by following the procedure below.
- Again, secure your rope through a solid anchor.
- With your back towards the cliff, put the two strands of rope between your legs, pull them together from your back and bring them up from your right hip, across your chest to your left shoulder if you’re right-handed.
- Loop the rope around the back of your neck, down your back, and down your right arm.
- If you’re left-handed, it’s from your left hip, across your chest to your right shoulder, around the back of your neck, down your back, and down your left arm.
- Grip the rope securely with your dominant hand and back down slowly. You control your rate of descent with this side of the rope by letting go as slow or as fast as you require. Your other hand should be holding on to the rope from the anchor and mainly used to maintain your balance.
- Again, a prusik back-up knot on the rappelling rope would be prudent.
Can You Rappel With an ATC Pilot?
The ATC Pilot is actually designed for belaying, but it certainly can be used for rappelling. The device can accommodate ropes 8.7 to 10.5mm in diameter. The only drawback is you can only use one strand with the ATC Pilot. The ATC Pilot is useful for a single-pitch rappel but not recommended if you are going to do multi-pitch rappelling.
The ATC Pilot also has the advantage of not being “handed’, that is, the same device can be used by either right- or left-handed climbers. This is a feature other similar devices cannot do.
How Do You Use a Rappelling ATC?
You can rappel with an ATC following the steps:
- First, build a secure anchor.
- Check your harness that everything is in order and step into it.
- Place the rope on your dominant side, right for righties and left for lefties.
- Thread the rope through the ATC, either single or double strand, and align it with the keeper loop on the device. Make sure the downhill side is oriented to your braking hand.
- Now clip a locking carabiner through both ropes and the keeper loop of the ATC device if you are rappelling double-strand. Attach the carabiner to the belay loop on your harness.
- Pulling your brake hand behind you will slow down your descent, while pushing it away from you will speed up your descent.
- Double-check your system before slowly backing down the slope at the start of your rappel.
How Do You Rappel Without an ATC?
Rappelling without an ATC has been discussed earlier in this article. Just to recap, it can be done by using the carabiner method or the Munter hitch method if you have extra carabiners (which you would always have anyway). Rappelling with rope-only methods like the Swiss seat, South African technique, the Dulfersitz Rappel Method. It’s always useful to be familiar with these alternative techniques should you find yourself in a situation where these may come in handy.
Can You Use a Grigri to Rappel?
Yes, you can use the Grigri to rappel. The Grigri is equipped with a locking device that is very convenient when you have to stop along your descent. It also helps to break your fall should an unfortunate slip happens.
The Grigri can be used only for single-rope rappelling or belaying. The Grigri most effectively works with ropes in the 9.7 to 11mm range, although it can be used for thinner ropes down to 8.5mm.
How Do You Rappel with a Grigri?
Rappelling with a Grigri is similar to using other rappel devices; the only difference is you are using a Grigri as your rappel device of choice. Having said that, the Grigri has some features that differ from other rappelling devices. Set up your rappel gear (anchors, harness, etc.) in the same way you would set it up when you use different devices.
Set up the Grigri by following these steps:
- Insert the rope in the Grigri by opening the faceplate and following the pictogram on the Grigri that shows how the rope should be oriented.
- The side showing a hand with a rope denotes the braking side of the Grigri, while the side showing the climber goes to the anchor.
- Check if you loaded the rope correctly, giving it a sharp tug at the active side. The rope should lock in when you do this. If not, remove the rope and reload. This is the self-locking feature of the Grigri. A sudden load on the rope, such as a fall by the climbers, triggers the locking mechanism of the Grigri to pinch the rope and arrest the fall.
- However, the Grigri is not a foolproof self-locking device. It always needs an active brake hand and, therefore, an attentive climber or belayer.
- You lower yourself by keeping a firm hold on the brake strand and slowly pulling back on the lever to release the locking mechanism. Once the locking mechanism is released, you can control the speed of your descent using the brake strand.
What to Wear for Rappelling?
What you wear during rappelling will up to your personal style preferences. But there are must-have items you simply can’t do without. A common thread through them is they must be comfortable and functional. You may add or remove some items from the suggested list below.
- Helmet: This protects you from falling debris.
- Harness: The harness or you won’t have anything to connect you to the rope.
- A good pair of hiking or climbing shoes: Even tennis or rubber shoes would do if the terrain is not too rough.
- Pants: Be conscious of the weather when you plan to climb, as it may determine your choice of pants, whether long or shorts. They must not be too long so as to interfere with your feet’s movement.
- Shirts/tops: You may use long-sleeved or short-sleeved shirts according to your preference. You can even go shirtless but be prepared to suffer some scrapes and bruises. Your shirt should not be too loose as it gets snagged in the ropes or the rappel devices.
- Gloves: To protect your hand from rope burns.
- Jackets, sweaters, or rain gear: They might come in handy if the weather warrants it.
- Sunglasses: They would help lessen the glare off the cliff face.
- Hair ties: If you have long hair, tie it down. You don’t want your hair getting caught in the ropes.
- Knee, elbow, or shoulder pads: Might come in handy in certain situations.
- Sunscreen: Protect your skin from all those UV rays.
- Extra pair of socks: You never know when you might need them!
- A hat: An extra layer of protection won’t hurt.
- Remove jewelry: They might get caught up in something.